This is an old revision of the document!
Table of Contents
MAGE Tutorial FAQ (Incomplete)
Note: This guide was made in reference to MAGE 1.0.0
Blocks and Clipdata
Part 1- Interface
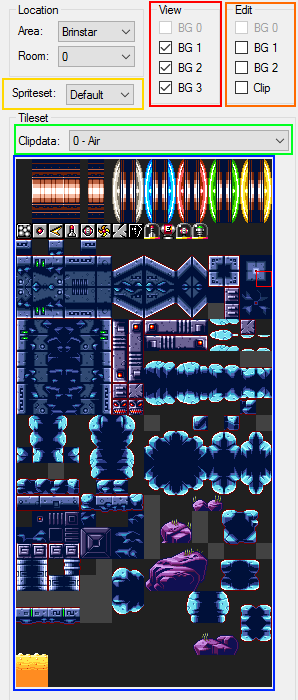
The screen to the left of a visible room in MAGE will look like this.
- Red- View selection (use to view certain layers)
- Orange- Edit selection (use to select a layer to edit and whether or not to edit clipdata)
- Yellow- Spriteset selection
- Green- Clipdata selection (only active if clipdata edit is selected)
- Blue- Tile selection; chosen from available tiles in tile set
Part 2- Layers and Clipdata
The first step to editing rooms is selecting what layer you want to change. There are 3 layers of tiles that changes how the room looks and one layer that determines how the player will interact with those hitboxes.
- BG 0 – The foreground objects lie here, they appear in front of everything (including the player)
- BG 1 – This is most commonly what is used for the player to walk on.
- BG 2 – Includes background objects, which do not usually affect the gameplay and are there for decorative purposes (rocks and plants). They appear behind everything
- BG 3 - This is the entire background image. You can't select this for editing, but you can turn it on or off.
You can only have one of these selected at a time to edit. You can also click on their views to show/hide them in case you need to see something from a different perspective. Keep in mind that all of these layers scroll at the same rate, and as such you will not experience any parallax scrolling with them.
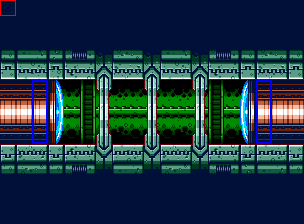
Brinstar, Room 6 with and without BG 0 view

The final choice of importance is “clipdata”. Clipdata is not tied to any layer; rather, it decides how a specific block in the room will act. You can select to edit clipdata along with layers while making blocks; however, since you may want to edit clipdata for several different blocks at the same time it is possible to select clipdata without any other option.
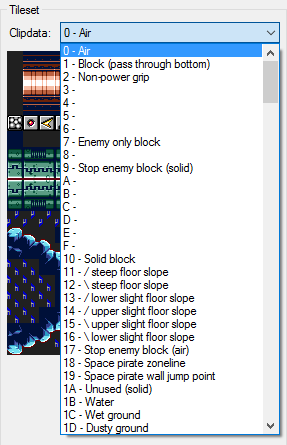
Shown above is the drop down menu for selecting clipdata. I will explain the different types of clipdata later in this chapter. Keep in mind that some types of clipdata have only minor differences that may wreak havoc upon level design if used incorrectly (i.e. no reform and never reform).
Part 3- Editing Layers
This section will explain how to edit how a layer “looks”, but now how it works (clipdata). Make sure that you have selected the correct layer to edit before you start editing the room you have chosen. Also, make sure to choose the correct layer that corresponds with the type of block you want to work with.
Controls
- Left Click - Paste Block(s)
- Right Click - Copy Block(s)
When selecting blocks to copy, you can select from either the tile table or from the map. If you select blocks from the map, it will only copy blocks from the layer you are currently on. This can be used to build pre-determined structures more quickly or to copy things that you may want to reuse several times in a room.
For example, in the pictures below a door is selected. Later, it is pasted into the room as a whole set of blocks (the red box is the outline for where it would be placed if the mouse left clicked again).
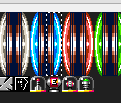 →
→ 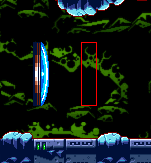
A general rule of thumb for editing layers is to make the blocks that Samus can stand on be Layer 1, since Layer 2 will always appear behind her.
Part 4- Clipdata
In bland terms, Clipdata is how each block works. Each tile location in a room has a certain clipdata value assigned, be it 0 for air or 10 or solid. There are FF (255) slots available for different types of clipdata, however many are unused. Be very careful when editing clipdata in a room, because clipdata will work how it wants whether or not you have a block placed in a slot (for example, you can have an invisible slope in the air due to clipdata that has been assigned to empty squares). This means that any block that you do not want to be special will be assigned clipdata value 0, which indicates “air”.
Clipdata is edited in the same way as block layers, with the only difference being that if you select a large group of blocks in the tile table, they will all share the same clipdata. MAGE is very generous in explaining what each clipdata number does, so I will just explain the important values whose functions may not be obvious at
0: Air - Allows Samus, enemies, and pretty much any sprite to move through it. Consider it the “empty” clipdata
1: Block (pass through bottom) - A solid block that is not solid from the bottom. Works like those blocks in Mario games where you can jump up through them but then run on top.
2: Non-power grip - Pretty self explanatory, a solid block that you cannot grab onto with power grip.
7: Enemy only block - Blocks that act like “air”, but only for the enemy. Used in Zero Mission for places to hide those annoying bug enemies that come out of the walls.
9: Stop enemy block (solid) - Works just like a solid block, stops space pirates from moving if there is no alarm
10: Solid - Does not allow anything to pass though it (except wave beam, obviously)
11/12: Steep floor slope - A slope in the floor that lifts the player one block. For reference, / means it goes low to high when moving right, while \ means it goes high to low when moving right.
13-16: Upper/Lower slight floor slope - Floor slopes that extend over 2 spaces. Make sure to use Lower on the lower end of a slope
17: Stop enemy block (air) - Works like an air block for Samus, but a solid block for enemies


