https://dumping.guide/carts/nintendo/gba#methods
https://wiki.no-intro.org/index.php?title=Game_Boy_Advance_Dumping_Guide
Note: The download link for GBA Backup Tool is down. Use the following links instead:
https://www.gamebrew.org/wiki/GBA_Backup_Tool
https://kotei.blog.ss-blog.jp/2008-10-26
zero_mission:basic_guides:mage
Table of Contents
<WRaAP center 75% leftalign>
HOW TO EDIT METROID ZERO MISSION
 (INCOMPLETE)
This wiki has some limitations. Refresh the page if images stop loading.
Note: This guide was made in reference to MAGE 1.4.0 Documentation and is HEAVILY based on the Super Metroid Mod Manual (SMMM) by begrimed.
Quick Links:
Metroid Zero Mission - Clipdata List
GETTING READY TO ROM HACK
Guide Expectations
This guide expects the reader to be using Microsoft Windows operating system to hack. If you are using Mac or a Linux distro, congrats! It is doable now! Though you may need to perform some workarounds.
This guide is written for use with MAGE 1.4.0. At the time of writing MAGE only supports USA ROMs.
Create a ROM Hacking Folder
Create a rom hacking folder of some kind. The name and the way it gets organized doesn't matter much.
This ensures you do not misplace any important files, and they all stay in one place.
Obtain a USA Metroid Zero Mission ROM
You must either dump your ROM or search online. Check the first footnote to see how to dump your ROMs. 1)
Make sure you can see file extensions!
On Windows 10, launch File Explorer, click on the View tab, then tick ☑ File Name Extensions. On Windows 11, open File Explorer, and then click View > Show > File Name Extensions.
The ROM should be Metroid - Zero Mission (U) [!].gba. The (U) is short for USA, and [!] means verified good dump. .gba means it's a gameboy advance ROM.
The ROM's sha1 hash should be 5DE8536AFE1F0078EE6FE1089F890E8C7AA0A6E8. To verify your ROM, use Quickhash GUI. Go to the File tab. Drag-and-drop your ROM over the application. Copy the sha1 hash from this wiki page to your clipboard, and paste it into the text box below Expected Hash Value. A message will appear on the screen telling you if it matches. If it does NOT MATCH, you either need to dump the cart again, or you have the wrong ROM.
Once you have the correct ROM, you should put it someplace safe, and only edit copies of it. NEVER edit the original. If you follow this practice, you will not have to re-dump or re-download your ROM when you accidentally corrupt or otherwise destroy a copy of it. I personally stick it into a Vanilla ROMs folder, and NEVER open it with ANY editors. When I need a clean slate, I go into that folder, copy the rom, and then paste it into my romhacking folder.
Download a Game Boy Advance (GBA) emulator
Download mGBA. It loads fast, is cross-platform, and accurate enough. For the easiest experience, download and run the installer.
Once installed, set mGBA as the default program to open GBA files.
This can be done by right-clicking a GBA rom and selecting Open with…. If mGBA does not appear on the list, Scroll down and select More Apps ⬇. If mGBA is still not there, scroll down and select Look for another app on this PC.
If you used the 64-bit installer, Browse to C:\Program Files\mGBA and select mgba.exe.
If you used the 32-bit installer, Browse to C:\Program Files (x86)\mGBA and select mgba.exe.
If successful, the thumbnail of gba ROMs should now look like mGBA. mGBA should be able to open and play your ROM.
Download MAGE and make sure it works
MAGE Requires .NET 3.0 to be able to function. If your system does not have it installed, Windows 10 will prompt you to install the .NET Framework 3.5 (Includes 2.0 and 3.0) feature. Once it is completed, the window will disappear, and you should be able to open MAGE.
MAGE's files
| Name | Description |
|---|---|
| mage.exe | Metroid Advance Game Editor |
| doc.html | MAGE Documentation |
| technical.html | Technical Information about MAGE and the MAGs |
| *.proj files (created next to your ROM) | MAGE Project files. Keeps track of content ADDED to your ROM (new rooms, new doors etc) |
| %temp%\test.gba | ROM for test room based on currently opened ROM in mage. Regenerated every time you test room. |
| %localappdata%\mage\ | Application settings folder |
| %localappdata%\mage\mage_1.4.0.exe[…]\1.4.0.0\user.config | Contains paths to recent ROMs, path to emulator for testing rooms, UI settings |
Set up MAGE for easy room testing
Use File → Open ROM… to find and select your Metroid Zero Mission ROM. Alternatively, drag and drop your ROM over MAGE once it is open.
If all is well, you should be loaded into the very first room in Brinstar.
Move your mouse pointer somewhere in the room and then press the T key. The very first time you do this, a message will appear:
------------------------------------------------------------------
GBA emulator path has not been set. Would you like to set it now?
------------------------------------------------------------------
            +=========+              +========+
            |   Yes   |              |   No   |
            +=========+              +========+
Select Yes, then look for mGBA.
If you installed 64-bit mGBA, it will be located at C:\Program Files\mGBA\mGBA.exe.
If you installed 32-bit mGBA, it will be located at C:\Program Files (x86)\mGBA\mGBA.exe.
If successful, mGBA will launch your test ROM. You can close mGBA.
THE INSANELY ABSOLUTE IMPORTANCE OF MAKING REGULAR ROM BACK-UPS
All you have to do is click File → Create Backup. The filename of the backup is a timestamp, in the format YYYY-MM-DD_HH-MM-SS.gba
Alternatively, you can right-click your ROM and select 'copy'. After that, right-click a second time and select 'paste'. The filename of the backup is in the format filename (copy #).gba
It cannot be stressed enough how important it is to create regular back-ups of the ROM that you're working on. Make regular and frequent ROM back-ups a habit. Back-ups are your friend, and they will spare you so much pain. There is no reason to not make back-ups.
In addition to on your computer, keep back-ups of your hack stored on USB thumb drives, extra hard drives, web servers, email them to yourself, burn them to CDs or DVDs if you need to. You do not want to lose a thousand collective hours of work on a hack because your computer broke and you didn't have a copy of your hacked ROM anywhere else except on your dead computer's hard drive.
IF YOU ARE EVER ABOUT TO APPLY A PATCH OR MAKE AN EDIT THAT YOU ARE EVEN SLIGHTLY UNSURE OF, CREATE A BACK-UP FIRST. Preventing catastrophe is just that easy. If hard drive space is an issue, you can create back-up IPS patches of your hack instead (see IPS patch creation).
Constant Experimentation, Trial and Error, Broken ROMs and Strange Crashes are Normal.
Stay calm and don't let it get you down! It is pretty much impossible to avoid experiencing all of these things and more as you journey through creating your own Metroid Zero Mission hack. Constant experimentation especially - you will need to test everything constantly as you're working on it, or you might waste huge amounts of time stepping backwards through your edits to figure out the problem. TEST EVERYTHING, ALWAYS.
Sometimes, you may make a mistake. That's OK, happens to the best of us! You can quickly reload your rom by selecting it in File → Recent Files
Please report any MAGE bugs that you discover!
If you discover a crash or some kind of bug with MAGE itself, click “Help → About Mage → https://forum.metroidconstruction.com/index.php/topic,3969.0.html” and write out a clear description of the error that you experienced. Can the bug be done consistently, or did it only happen once? Is it possible to take a screenshot of the error?
PART 1: MAGE'S EDITORS & OPTIONS
REMINDER: This wiki has some limitations. Refresh the page if images stop loading.

Main Window
Menu Bar
1. File Menu
| Name | Description |
|---|---|
| Open ROM… | USA Zero Mission / USA Fusion ROMs Only (At the time of writing) |
| Save ROM | Instantly saves changes made to ROM since it has been opened. This is the ONLY way to permanently save changes. |
| Save ROM as… | Save ROM, but you specify what to name the ROM and where it is saved. |
| Create Backup | Instantly backs up your rom, saved to the same folder. Filename format YYYY-MM-DD_HH-MM-SS.gba |
| Recent Files | List of recently opened ROMs. Can be used to reload ROM if undesirable changes are made. |
Note: Some editors will tell you Changes Saved. Don't panic! The ROM you are editing in MAGE is a temporary copy. MAGE will only save edits to your ROM if you explicitly tell it to.
If you broke your ROM, or made some undesirable change, you can reset the internal copy by reopening your ROM in MAGE.
2. Edit Menu
| Name | Description |
|---|---|
| BG Editing Mode | Used to edit blocks on background layers and their collision properties (clipdata). |
| Object Editing Mode | Used to edit objects like enemies, doors, and camera scrolls. |
| Use Selected Clipdata | When selected, blocks placed (or pasted) will use the clipdata value from the drop-down list above the tileset. |
| Undo | Steps back edits one at a time. MAGE can remember up to 100 edits. |
| Redo | Steps forward edits one at a time. MAGE can remember up to 100 edits. |
| BG 0 | Place blocks on Background layer 0. BG0 is a very special layer, but most of the time it's on top. |
| BG 1 | Place blocks on Background layer 1. BG1 is where all the blocks samus and enemies collide with should be. |
| BG 2 | Place blocks on Background layer 2. BG2 is for blocks behind samus and enemies, like plants or rocks for scenery. |
| Clip | “Clip Data.” Set the type of block used at that X/Y position in the room. Clip can be edited with one layer simultaneously. (ex: Edit BG1 & Clip) |
Note: You cannot use both BG editing mode and Object editing mode at the same time. You pick one or the other
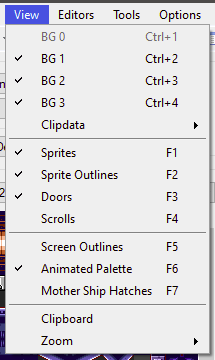
3. View Menu
| Name | Description |
|---|---|
| BG 0 | Toggle viewing Background layer 0. BG0 is a very special layer, but most of the time it's on top. |
| BG 1 | Toggle viewing Background layer 1. BG1 is where all the blocks samus and enemies collide with should be. |
| BG 2 | Toggle viewing Background layer 2. BG2 is for blocks behind samus and enemies, like plants or rocks for scenery. |
| BG 3 | Toggle viewing Background layer 3. BG3 is the farthest back there is. It's usually an image. |
| Clipdata → Collision | Toggle outlines around structures of blocks with solid collision. Usually red outlines, but Some blocks like door caps use a different color. |
| Clipdata → Breakable | Toggle revealing breakable blocks. It's like using a Power Bomb. |
| Clipdata → Values | Toggle view of clipdata ID numbers shown for every block in a room, like the Super Metroid Integrated Level Editor (SMILE). |
| Sprites | Toggle viewing objects on screen such as enemies, chozo, save stations, major items. |
| Sprite Outlines | Toggle solid green squares used to show the true position of objects in the room. |
| Doors | Toggle solid blue outlines for doors in the room. Useful to move, edit, resize or delete them. |
| Scrolls | Toggles viewing scrolls if there are any, used to keep the player camera within their bounds. |
| Screen Outlines | Toggles a white outline of each screen in a room, plus change. Helps for aligning scrolls, doors, tiles, objects, you name it. |
| Animated Palette | Toggles viewing animated palette, if there is one. You won't see the animation, just the first palette, but it'll show you that one exists. |
| Mother Ship Hatches | Toggles replacing brown Zebes hatches with purple Mothership hatches. |
| Clipboard | Opens a window that updates to show what you have copied to MAGE's clipboard. |
| Zoom | Pick between 100%, 200%, 400% and 800% Zoom. |
Notes: Only one of the special clipdata views can be used at a time.
Viewing Mothership hatches will not set the room to use them; it will just show them that way in the editor.
4. Editors Menu
| Name | Description |
|---|---|
| Header Editor | Specify a room's tileset, music, location on the map, transparency, room effect, what spriteset(s) it will use, and so on. |
| Tileset Editor | Pointers for graphics, tilemaps, palettes, animations etc. |
| Graphics Editor | Used for viewing, exporting and importing graphics. |
| Palette Editor | Used to edit, export, and import palettes, with shortcuts for known tileset and object palettes. |
| Tile Table Editor | Used to edit the tile maps of tilesets, title screen, user interface, etc. Tilemaps say how to arrange the graphics and what palettes to use. |
| Animation Editor | Adjust the properties of animated tiles and palettes, from assigned “animated tileset” to graphics, direction, speed, dimensions, etc. |
| Sprite Editor | Use to tweak pointers, HP, damage, weaknesses, and drop probability of primary and secondary sprite objects. |
| Spriteset Editor | Because of VRAM limitations, there are limits to variety of objects in a room. Spritesets are used to specify which objects and in what order. |
| Minimap Editor | Edit the map of each area with options for secrets, heat rooms, what players will first see, and what they will reveal at a map station. |
| Connection Editor | Used to link door objects together, use events to lock or connect to a secondary destination, even show location names as a text message. |
| Text Editor | Edit most text in the game i.e. in game messages, descriptions, story, location names, and stuff on the file screen. |
| Demo Editor | Edit the demos you see when you wait at the title screen long enough. Much easier with VBA-RR emulator and this lua script. |
| Physics Editor | Use to tweak how Samus feels, from her speed to how high she jumps, how she accelerates, when speed booster kicks in etc. |
| Weapon Editor | Change weapon stats like damage, firerate, timers for bombs, projectile velocity, limit how many shots can be on screen, etc. |
Notes:
5. Tools Menu
| Name | Description |
|---|---|
| Room Options… | Used to quickly erase BG 0, 1, 2, and Clipdata layers. Also lets you resize the current room. |
| Test Room… | Launches a test copy of your ROM in an emulator at the specified X/Y coordinates, with a debug menu on or off. |
| Clipdata Shortcuts | INCREDIBLY HANDY way to quickly select common clipdata types. Just click to set the clipdata you want to place. |
| Import → Tileset… | Import a MAGE Tileset (.mgt) file. You get to choose what it replaces. If importing from metroid fusion, tick the box “Use current game's generic tiles”. |
| Import → RLE Background… | Import RLE compressed background layer (BG 0, 1, 2, Clipdata) from .rlebg file. Can be used to duplicate a room for event shenanigans. |
| Import → LZ77 Background… | Imports a BG 0 or BG 3 tilemap basically. The graphics don't change. Not recommended but you may have a happy accident if you're bored. |
| Import → Room… | Import a MAGE Room (.mgr) file. You choose what to import and what room to replace. If importing from Metroid Fusion, Do NOT import sprites or doors! |
| Import → Tileset from image… | Must be 32bpp with transparency, 256px width, height divisible by 16. Don't use too many palettes or unique 8×8 tiles, and 8×8 tiles must use less than 16 colors. |
| Import → LZ77 BG from image… | Can be BG 0 or BG 3. Must be 256×256, 512×256, or 256×512. Otherwise it's got the same limitations as importing a tileset from image. |
| Import → Ending from image | Image must be 240×416. MAGE will limit colors while preserving quality. This is slightly random so if you dislike what it churns out, try again until you like it. |
| Export → Tileset… | Export a MAGE Tileset (.mgt) file. It can be the current room's tileset or another tileset based on ID. |
| Export → Background… | Export an RLE compressed (.rlebg) or LZ77 compressed (.lzbg) background, to import in another room or ROM. Ideally with the same tileset. |
| Export → Room… | Export a MAGE Room (.mgr) file. |
| Export → Tileset Image… | Export the tileset from the current room as an image. (.png) |
| Export → BG0 Image… | Export BG 0 from the current room as an image. (.png) |
| Export → BG3 Image… | Export BG 3 from the current room as an image. (.png) |
| Export → Room Image… | Export an image of the current room. (.png) Useful for Room of the Month (ROTM) submissions. Any view options enabled in MAGE will be visible. |
| Compression → LZ77 Compress File… | Opens a File Explorer prompt. Any file you select will be LZ77 compressed. |
| Compression → LZ77 Decompress File… | Opens a File Explorer prompt. Any file you select will be DEcompressed using LZ77 algorithm. |
| Minimap Tile Builder | Tool to create more minimap tiles if the map tile you want to use doesn't exist. Uses an internal copy of vanilla map tiles. |
| Add → Background | Add background layers to a room that is missing them. Most often used to add BG 0 to rooms that don't have it. |
| Add → Room Sprites | Add alternate spritesets to a room that doesn't have them. |
| Add → Room | Add extra rooms to the game. Either blank, or duplicate of an existing one. |
| Add → Tileset | Add extra tilesets to the game. Either blank, or duplicate of an existing one. |
| Add → Spriteset | Add extra spritesets to the game. Either blank, or duplicate of an existing one. |
| Add → Animation | Add extra animations to the game. Either blank, or duplicate of an existing one. |
| Patches | Apply some optional patches. None of them add data to the rom, they just modify existing code. |
Notes: In the header editor, if the property (prop) value of a BG layer is 0x10, it is RLE compressed. If the value has 0x40, it is LZ77 compressed. BG 1 and 2 are always RLE, BG3 is always LZ77, and BG0 can be either.
For importing tilesets / backgrounds from images, you can game it to generate palettes that are just as uniform as those already in the game. Organize the tileset into sections based on what palette blocks use, and from there keep the top left of each section blank. For each section with a different palette, draw an 8×8 tile with the palette in the order you want it to generate, from left to right top to bottom. The top leftmost pixel should be left as the first color, which acts as blank/transparent.
6. Options Menu
| Name | Description |
|---|---|
| Default View | Set default view settings for MAGE. Only refreshes when you reload a room. |
| Number Base | Switch between using decimal (base 10) and hexadecimal (base 16) as the number base for MAGE. Decimal might cause problems so Hex is recommended most of the time. |
| Disable Tooltips | Hides messages that appear under the mouse cursor when it idles over a point of interest. On Linux they remain as visual artifacts so disabling them is recommended. |
7. Help Menu
| Name | Description |
|---|---|
| View Help | Opens the MAGE help file. (doc.html) It's nice to have handy. |
| About MAGE | Information about MAGE, like the version you are using, who made it, where you can report issues, and credit for assets used. |
Tool Bar
Quick access to editors and frequently used actions with interactible icons.
8. Open / Save ROM
9. Undo / Redo
Note: Click the small arrow ▼ to undo/redo multiple steps at a time.
10. BG / Object Editing Mode
Switch between editing blocks (speedbooster) or objects (morphball). You will be using this a LOT.
When a sprite is added in object editor mode, you can quickly change it with [ or ]
On QWERTZ keyboard, the keys for this are “ß” and “´”
Door Exit Distances:
10- Right, no hatch
20- Right, hatch
E0- Left, hatch
F0- Left, no hatch
11. View Sprites / Outlines / Doors / Scrolls
| Icon | Description |
|---|---|
| Metroid | Show/Hide Sprites (enemies and objects with AI, e.g. morph ball item) |
| Green Box | Show/Hide Sprite Outlines (actual position of the objects/enemies) |
| Blue Box | Show/Hide Doors (objects used to link rooms) |
| Yellow Box | Show/Hide Scrolls (objects used to restrict the player camera) |
12. Header Editor
ADD IMAGE TODO
BACKGROUND DATA
| Name | Description |
|---|---|
| Tileset | Show/Hide Sprites (enemies and objects with AI, e.g. morph ball item) |
| Transparency | Show/Hide Sprite Outlines (actual position of the objects/enemies) |
| BG3 Scroll | Show/Hide Doors (objects used to link rooms) |
| Effect | Show/Hide Scrolls (objects used to restrict the player camera) |
| Effect Y Pos | Show/Hide Sprites (enemies and objects with AI, e.g. morph ball item) |
POINTER
| BG0 | Show/Hide Sprite Outlines (actual position of the objects/enemies) |
| BG1 | Show/Hide Doors (objects used to link rooms) |
| BG2 | Show/Hide Scrolls (objects used to restrict the player camera) |
| BG3 | Show/Hide Sprites (enemies and objects with AI, e.g. morph ball item) |
| CLIP | Show/Hide Sprite Outlines (actual position of the objects/enemies) |
PROP (BG PROPERTY)
| BG0 | Show/Hide Doors (objects used to link rooms) |
| BG1 | Show/Hide Scrolls (objects used to restrict the player camera) |
| BG2 | Show/Hide Sprites (enemies and objects with AI, e.g. morph ball item) |
| BG3 | Show/Hide Sprite Outlines (actual position of the objects/enemies) |
SPRITESET DATA
POINTER
| DEFAULT | Show/Hide Doors (objects used to link rooms) |
| FIRST | Show/Hide Scrolls (objects used to restrict the player camera) |
| SECOND | Show/Hide Sprites (enemies and objects with AI, e.g. morph ball item) |
SET
| DEFAULT | Show/Hide Sprite Outlines (actual position of the objects/enemies) |
| FIRST | Show/Hide Doors (objects used to link rooms) |
| SECOND | Show/Hide Scrolls (objects used to restrict the player camera) |
EVENT
| FIRST | Show/Hide Sprites (enemies and objects with AI, e.g. morph ball item) |
| SECOND | Show/Hide Sprite Outlines (actual position of the objects/enemies) |
MISCELLANEOUS
| MAP X | Show/Hide Doors (objects used to link rooms) |
| MAP Y | Show/Hide Scrolls (objects used to restrict the player camera) |
| MUSIC | Show/Hide Sprites (enemies and objects with AI, e.g. morph ball item) |
| Name | Description |
|---|---|
| AREA | Show/Hide Sprite Outlines (actual position of the objects/enemies) |
| ROOM | Show/Hide Doors (objects used to link rooms) |
| OFFSET | Show/Hide Scrolls (objects used to restrict the player camera) |
| APPLY | Show/Hide Doors (objects used to link rooms) |
| CLOSE | Show/Hide Scrolls (objects used to restrict the player camera) |
13. Tileset Editor
14. Graphics Editor
15. Palette Editor
16. Tile Table Editor
17. Animation Editor
18. Sprite Editor
19. Spriteset Editor
20. Connection Editor
21. Minimap Editor
22. Text Editor
23. Demo Editor
24. Physics Editor
25. Weapon Editor
26. Room Options
27. Test Room
28. Minimap Tile Builder
29. Add
30. Patches
Room Editor

1. Edit Layers
2. View Layers
3. Location
4. Spriteset
5. Clipdata
6. Tile Select
7. Current Tile Information
8. Cursor
9. Tooltip
Part 1- BG Editing Mode
The first step to editing rooms is selecting what layer you want to change. There are 3 layers of tiles that changes how the room looks and one layer that determines how the player will interact with those hitboxes.
- BG 0 – The foreground objects lie here, they appear in front of everything (including the player)
- BG 1 – This is most commonly what is used for the player to walk on.
- BG 2 – Includes background objects, which do not usually affect the gameplay and are there for decorative purposes (rocks and plants). They appear behind everything
- BG 3 - This is the entire background image. You can't select this for editing, but you can turn it on or off.
You can only have one of these selected at a time to edit. You can also click on their views to show/hide them in case you need to see something from a different perspective. Keep in mind that all of these layers scroll at the same rate, and as such you will not experience any parallax scrolling with them.
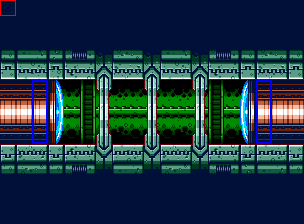
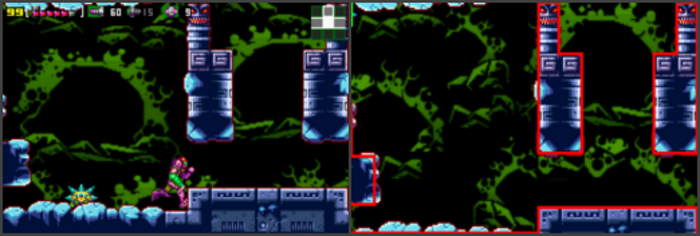
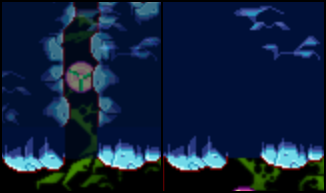
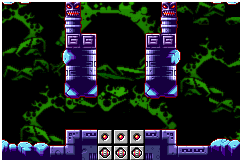
Brinstar, Room 6 with and without BG 0 view

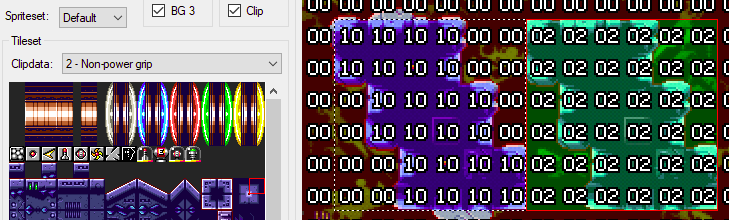
The final choice of importance is “clipdata”. Clipdata is not tied to any layer; rather, it decides how a specific block in the room will act. You can select to edit clipdata along with layers while making blocks; however, since you may want to edit clipdata for several different blocks at the same time it is possible to select clipdata without any other option.
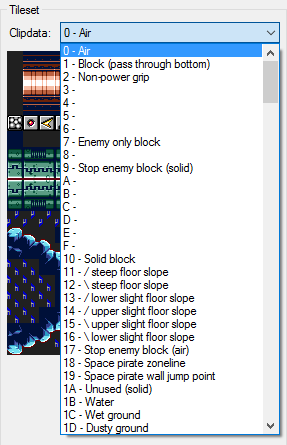
Shown above is the drop down menu for selecting clipdata. I will explain the different types of clipdata later in this chapter. Keep in mind that some types of clipdata have only minor differences that may wreak havoc upon level design if used incorrectly (i.e. no reform and never reform).
1A- Layers
This section will explain how to edit how a layer “looks”, but not how it works (clipdata). Make sure that you have selected the correct layer to edit before you start editing the room you have chosen. Also, make sure to choose the correct layer that corresponds with the type of block you want to work with.
Controls
- Left Click - Paste Block(s)
- Right Click - Copy Block(s)
When selecting blocks to copy, you can select from either the tile table or from the map. If you select blocks from the map, it will only copy blocks from the layer you are currently on. This can be used to build pre-determined structures more quickly or to copy things that you may want to reuse several times in a room.
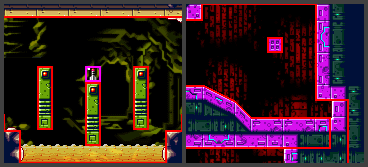
For example, in the pictures below a door is selected. Later, it is pasted into the room as a whole set of blocks (the red box is the outline for where it would be placed if the mouse left clicked again).
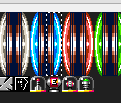 →
→ 
A general rule of thumb for editing layers is to make the blocks that Samus can stand on be Layer 1, since Layer 2 will always appear behind her.
1B- Clipdata
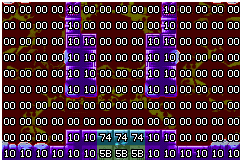
In bland terms, Clipdata is how each block works. Each tile location in a room has a certain clipdata value assigned, be it 0 for air or 10 or solid. There are FF (255) slots available for different types of clipdata, however many are unused. Be very careful when editing clipdata in a room, because clipdata will work how it wants whether or not you have a block placed in a slot (for example, you can have an invisible slope in the air due to clipdata that has been assigned to empty squares). This means that any block that you do not want to be special will be assigned clipdata value 0, which indicates “air”.
Clipdata is edited in the same way as block layers, with the only difference being that if you select a large group of blocks in the tile table, they will all share the same clipdata. MAGE is very generous in explaining what each clipdata number does, so I will just explain the important values whose functions may not be obvious at all.
Metroid Zero Mission - Clipdata List
Individual Clipdata and how to use them is explained in the above link!
Alternatively, you can read the next sections on the most used functions in rooms (highly recommended).
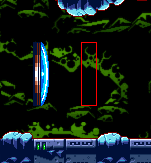
a. Basic Blocks
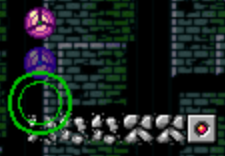
The most common types of blocks you will use are ground blocks. Clip0 and Clip10 (“Air” and “Solid Block”, respectively) will likely be your most used blocks in the room. Other blocks, such as Clip11 or Clip16 (“/ Steep Floor Slope” and “\ Lower Right Floor Slope”)
As seen above, solid clipdata prevents any sprites from moving through it. This includes the player, enemies, and projectiles (ok wave beam sure it passes through). Samus can pass through passages with a height of 2. Morph ball can pass through a passage with a height of 1. Slopes will work like they sound, they gradually make the player go lower. Keep in mind that Samus's head can not clip through the ceiling when going up or down a slope, so make sure to plan the overhead accordingly (shown bottom).

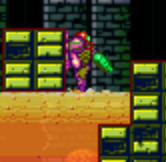
b. Item Tanks
Item tanks are much easier to use than they may seem at first. All one has to do is select the proper tile in the tileset and use the corresponding clipdata on the tile. For example, a missile would use Clip5D to denote its “tankiness.” If you have clipdata showing, expansion tanks will be shown as purple. Also, only Energy Tanks, Missile Tanks, Super Missile Tanks, and Power Bomb Tanks can be placed this way. All other items must be taken from a Chozo Statue (a set of sprites which I will explain later).
“But One,” you may be asking, “how do I set the tanks to have the properties of the blocks around them?” Well, this is very simple. Use Clip6C-Clip6F for expansions hidden in blocks that must be shot (like in the picture above on the right) or Clip7C-7F for expansions that are placed underwater.
c. Breakable Blocks
An important type of block to have is the breakable block. This includes anything from crumble blocks (which break under the player's feet) to screw attack blocks (which can only be broken with the screw attack). These come in 3 varieties: Reform, No Reform, and Never Reform. Reform means the block will reform after approximately 5 seconds. No Reform means that the block will not come back until the player leaves the room and returns. Never Reform indicates that the block will never reappear, no matter what happens in the world. Unfortunately, not every type of breakable block has each of these 3 settings (actually, none of them (excluding normal shot blocks) have all three; they usually have 2).

A breakable block to note is the horizontal and vertical bomb blocks. These can be used to create the infamous bomb chains that Zero Mission and Fusion have.
d. Water, Acid, and Lava
Clipdata A0, A1, and A2 are used for Weak Lava (which varia suit is immune to), Strong Lava (which gravity suit is immune to), and Acid (which nothing is immune to). These are fine to be used, however it is more recommended to use header effects (explained later) instead of these. The same goes for water, which is clipdata 1B.
e. BG0 Transparency
There are several clipdata blocks that affect layer 0. These are pretty odd, but essentially they change either the transparency of bg0 tiles or make it brighter/darker. Keep in mind that these apply effects to lava/acid/water if you have them in the room by using the room headers.
f. Door Transition Tiles
Doors are an essential part to any hack. Their use is not obvious, but it is rather simpler than one might expect. However, seeing as doors should be paired with sprites, I will explain how to use them in the sprites section.
Part 2- Object Editing Mode


Sprites can be easily edited by clicking the morph ball symbol at the top of MAGE. To access the sprite editor, click the long beam button. To access the spriteset editor, click the eticoon/dachora symbol to the right of the long beam.
a- Sprite Editor
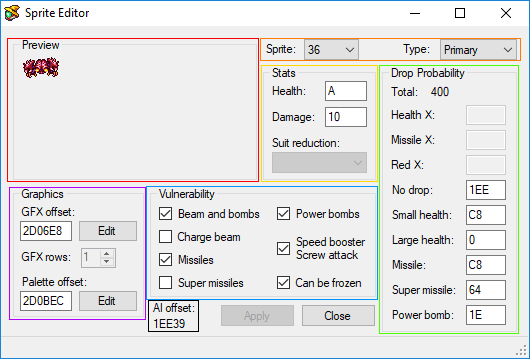
- Red - Sprite Preview, shows how the sprite looks. Some sprites like geemers and zeelas don't have their alternate colors shown since those are decided by their AI
- Orange - Sprite number and Primary/Secondary selection.
- Yellow - Health and Damage selection. Damage may not be accurate for boss sprites. Suit Reduction only applies to Fusion, where first number is varia suit and second is gravity
- Green - Drop Probability, the total for all drop chances must equal 400 (in hex). The probability is the drop's number divided by 400 (in hex).
- Blue - Vulnerability checkmarks. This decides what can damage an enemy.
- Purple - GFX and Pallete offsets. You can directly go to the graphics editor with these.
- Black - AI Offset. This just indicates to where the AI for the sprite is.
b- Spriteset Editor
Each room has a specific spriteset chosen for its room that can only have up to 8 rows of sprite graphics. This means that stuff like bosses and larger enemies may create problems if you want to have a lot of enemy variety in your room.
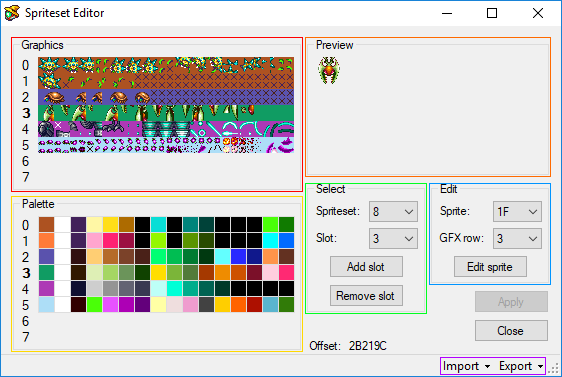
- Red - Graphics layout. Each spriteset can only have 8 rows of graphics. The bottom two rows are reserved for messages, so make sure that you don't have anything in those two rows if your room contains an item.
- Orange - Preview. Shows the currently selected sprite.
- Yellow - Palletes. These are all the sprite palette rows being used up by sprites in the spriteset.
- Green - Selection of spriteset editor and slot. There can be as many as F slots (aka 15 enemies), however this isn't particularly useful since you can only have 8 rows of graphics anyways.
- Blue - Sprite selection for the current slot you have selected. Then you also select what row the top row of the gfx should be on.
- Purple - Import/Export. You can import and export spritesets.
2A- Sprites
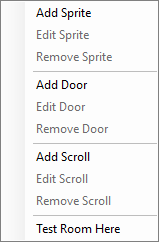
Right clicking anywhere on a room whilst in sprite edit mode will bring up the following menu
2B- Doors
2C- Scrolls
Header Editor
Tileset Editor
Graphics Editor
Palette Editor
Tile Table Editor
Animation Editor
Sprite Editor
Spriteset Editor
Connection Editor
Minimap Editor
Text Editor
Demo Editor
Physics Editor
Weapon Editor
PART 2: CREATING A ROOM
Basic level editing
Download a hex editor
Hex editor functions
Counting in hexadecimal
Copy/paste the room header
MAGE's room list
Room header format
Room pointers
Banks / ROM minimap
Level data
Background pointer
Room size / map position
Basic room structure
Doors pointer
Door data
Door BTS
Adding new doors
Room Scrolls pointer
Door ASM pointer
Debug your doors
PLM Set pointer
Scroll PLMs
H-Copy / V-Copy
MAGE's layers
Tile highlighting
Graphic Only / BTS Only
BTS (block types)
Basic room design
Slopes
Tiling errors
Up Scroll / Down Scroll
Camera snaps
Scroll snaps
Level design tips
LEVEL DESIGN MISTAKES TO AVOID
Finished room design
Enemy setup
Multi-piece enemies & possessors
Enemy headers
Enemy projectiles
Enemy Palette pointer
Enemy Weaknesses pointer
Enemy Drops pointer
Enemy GFX names
Enemy beta names
General enemy info / limitations
Enemy header copying
Layer 3 effects ("FX") / FX1
Door-specific FX
FX palette blends
Screen shakes
Bug fix: liquid graphics
Map editing
Bug fix: map saving/loading
Map icons
Room states / events
When to call a room finished?
PART 3: OTHER STUFF
Save stations
Elevators
Music selection
Song changes
Sound effects
Color palettes
Tile table editing
Repointing tilesets
Tile sheet (.GFX) editing
Tile rotation
Tileset mixing
Reassigning GFX colors
Graphic and palette locations
IPS/ASM patch usage and creation
Understanding basic ASM
Resources
FAQ
Glossary
Revision history
Special thanks / contact me
Main Window
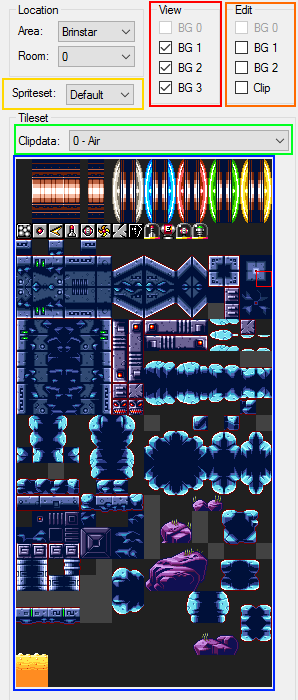
The screen to the left of a visible room in MAGE will look like this.
- Red- View selection (use to view certain layers)
- Orange- Edit selection (use to select a layer to edit and whether or not to edit clipdata)
- Yellow- Spriteset selection
- Green- Clipdata selection (only active if clipdata edit is selected)
- Blue- Tile selection; chosen from available tiles in tile set
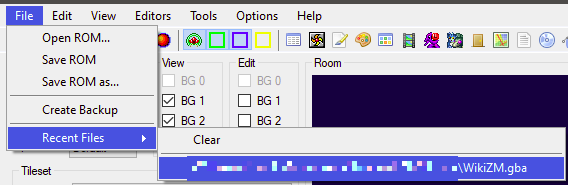
File
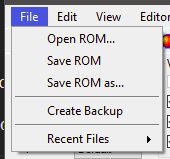
Backing up your ROM is as easy as clicking on Create Backup. The filename of the backup is a timestamp, in the format YYYY-MM-DD_HH-MM-SS.gba

Sometimes, you may make a mistake. That's OK, happens to the best of us! You can quickly reload your rom by selecting it in Recent Files
Edit
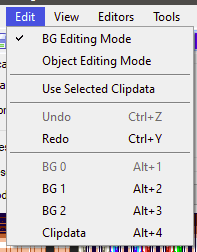
When Use Selected Clipdata is activated, tiles placed will use the clipdata value from the drop-down list.
View
Can be used to view clipdata in 3 different ways:
Collision(Outlines)
Breakable(Reveals hidden breakable blocks)
Values(Clipdata value and color)
You can also show or hide Sprites, Sprite Outlines, Doors and Scrolls.
To ensure that a room fits the screen, or to determine its shape in map tiles, you can turn on Screen Outlines.
If your room uses space pirate mothership hatches, you can select Mother Ship Hatches to swap to them.
You can also adjust Zoom level of the room to better see what you are doing.
Options
You can Disable Tooltips if you find them annoying.
If you find that the default view of MAGE shows too much or not enough, you can adjust the Default View. This includes visible background layers, outlines, clipdata, objects, scrolls, screen outlines and doors.
You also have the option of changing the Number Base from hexadecimal to decimal.
</WRAP>
zero_mission/basic_guides/mage.txt · Last modified: 2024/03/23 17:14 by felixwright


