Table of Contents
Metroid Fusion - MAGE Tutorial (Incomplete)
Note: This guide was made in reference to MAGE 1.3.2 Documentation
Quick Links: Metroid Fusion - Clipdata List
Main Window

The screen to the left of a visible room in MAGE will look like this.
- Red- View selection (use to view certain layers)
- Orange- Edit selection (use to select a layer to edit and whether or not to edit clipdata)
- Yellow- Spriteset selection
- Green- Clipdata selection (only active if clipdata edit is selected)
- Blue- Tile selection; chosen from available tiles in tile set
File

Create Backup… For one click backups
Recent Files - For fast ROM reloading
Edit
Swap between editing modes
View
Quick toggling of Layers
Clipdata viewing options
Toggle viewing Sprites/Scrolls/Doors
Toggle viewing Mothership hatches, Animated palettes, Screens
Zoom (%)
Options
Default View settings on MAGE launch
Toggle number base: Hex/Decimal
Help
“View Help” → MAGE Doc
Part 1- BG Editing Mode
The first step to editing rooms is selecting what layer you want to change. There are 3 layers of tiles that changes how the room looks and one layer that determines how the player will interact with those hitboxes.
- BG 0 – The foreground objects lie here, they appear in front of everything (including the player)
- BG 1 – This is most commonly what is used for the player to walk on.
- BG 2 – Includes background objects, which do not usually affect the gameplay and are there for decorative purposes (rocks and plants). They appear behind everything
- BG 3 - This is the entire background image. You can't select this for editing, but you can turn it on or off.
You can only have one of these selected at a time to edit. You can also click on their views to show/hide them in case you need to see something from a different perspective. Keep in mind that all of these layers scroll at the same rate, and as such you will not experience any parallax scrolling with them.
Main Deck, Room E with and without BG 0 view


The final choice of importance is “clipdata”. Clipdata is not tied to any layer; rather, it decides how a specific block in the room will act. You can select to edit clipdata along with layers while making blocks; however, since you may want to edit clipdata for several different blocks at the same time it is possible to select clipdata without any other option.

Shown above is the drop down menu for selecting clipdata. I will explain the different types of clipdata later in this chapter. Keep in mind that some types of clipdata have only minor differences that may wreak havoc upon level design if used incorrectly (i.e. no reform and never reform).
1A- Layers
This section will explain how to edit how a layer “looks”, but not how it works (clipdata). Make sure that you have selected the correct layer to edit before you start editing the room you have chosen. Also, make sure to choose the correct layer that corresponds with the type of block you want to work with.
Controls
- Left Click - Paste Block(s)
- Right Click - Copy Block(s)
When selecting blocks to copy, you can select from either the tile table or from the map. If you select blocks from the map, it will only copy blocks from the layer you are currently on. This can be used to build pre-determined structures more quickly or to copy things that you may want to reuse several times in a room.
For example, in the pictures below a door is selected. Later, it is pasted into the room as a whole set of blocks (the red box is the outline for where it would be placed if the mouse left clicked again).
 →
→ 
A general rule of thumb for editing layers is to make the blocks that Samus can stand on be Layer 1, since Layer 2 will always appear behind her.
1B- Clipdata
In bland terms, Clipdata is how each block works. Each tile location in a room has a certain clipdata value assigned, be it 0 for air or 10 or solid. There are FF (255) slots available for different types of clipdata, however many are unused. Be very careful when editing clipdata in a room, because clipdata will work how it wants whether or not you have a block placed in a slot (for example, you can have an invisible slope in the air due to clipdata that has been assigned to empty squares). This means that any block that you do not want to be special will be assigned clipdata value 0, which indicates “air”.
Clipdata is edited in the same way as block layers, with the only difference being that if you select a large group of blocks in the tile table, they will all share the same clipdata. MAGE is very generous in explaining what each clipdata number does, so I will just explain the important values whose functions may not be obvious at all.
Individual Clipdata and how to use them is explained in the above link! Alternatively, you can read the next sections on the most used functions in rooms (highly recommended).
a. Basic Blocks
The most common types of blocks you will use are ground blocks. Clip0 and Clip10 (“Air” and “Solid Block”, respectively) will likely be your most used blocks in the room. Other blocks, such as Clip11 or Clip16 (“/ Steep Floor Slope” and “\ Lower Right Floor Slope”)


As seen above, solid clipdata prevents any sprites from moving through it. This includes the player, enemies, and projectiles (ok wave beam sure it passes through). Samus can pass through passages with a height of 2. Morph ball can pass through a passage with a height of 1. Slopes will work like they sound, they gradually make the player go lower. Keep in mind that Samus's head can not clip through the ceiling when going up or down a slope, so make sure to plan the overhead accordingly (shown bottom).

b. Item Tanks
Item tanks are much easier to use than they may seem at first. All one has to do is select the proper tile in the tileset and use the corresponding clipdata on the tile. For example, a missile would use Clip5D to denote its “tankiness.” If you have clipdata showing, expansion tanks will be shown as purple. Also, only Energy Tanks, Missile Tanks, Super Missile Tanks, and Power Bomb Tanks can be placed this way. All other items must be taken from a Chozo Statue (a set of sprites which I will explain later).

“But One,” you may be asking, “how do I set the tanks to have the properties of the blocks around them?” Well, this is very simple. Use Clip6C-Clip6F for expansions hidden in blocks that must be shot (like in the picture above on the right) or Clip7C-7F for expansions that are placed underwater.
c. Breakable Blocks
An important type of block to have is the breakable block. This includes anything from crumble blocks (which break under the player's feet) to screw attack blocks (which can only be broken with the screw attack). These come in 3 varieties: Reform, No Reform, and Never Reform. Reform means the block will reform after approximately 5 seconds. No Reform means that the block will not come back until the player leaves the room and returns. Never Reform indicates that the block will never reappear, no matter what happens in the world. Unfortunately, not every type of breakable block has each of these 3 settings (actually, none of them have all three; they usually have 2).

A breakable block to note is the horizontal and vertical bomb blocks. These can be used to create the infamous bomb chains that Zero Mission and Fusion have.

d. Water, Acid, and Lava
Clipdata A0, A1, and A2 are used for Weak Lava (which varia suit is immune to), Strong Lava (which gravity suit is immune to), and Acid (which nothing is immune to). These are fine to be used, however it is more recommended to use header effects (explained later) instead of these. The same goes for water, which is clipdata 1B.

e. BG0 Transparency
There are several clipdata blocks that affect layer 0. These are pretty odd, but essentially they change either the transparency of bg0 tiles or make it brighter/darker. Keep in mind that these apply effects to lava/acid/water if you have them in the room by using the room headers.

f. Door Transition Tiles
Doors are an essential part to any hack. Their use is not obvious, but it is rather simpler than one might expect. However, seeing as doors should be paired with sprites, I will explain how to use them in the sprites section.
Part 2- Object Editing Mode


Sprites can be easily edited by clicking the morph ball symbol at the top of MAGE. To access the sprite editor, click the long beam button. To access the spriteset editor, click the eticoon/dachora symbol to the right of the long beam.
a. Sprite Editor

- Red - Sprite Preview, shows how the sprite looks. Some sprites like geemers and zeelas don't have their alternate colors shown since those are decided by their AI
- Orange - Sprite number and Primary/Secondary selection.
- Yellow - Health and Damage selection. Damage may not be accurate for boss sprites. Suit Reduction only applies to Fusion, where first number is varia suit and second is gravity
- Green - Drop Probability, the total for all drop chances must equal 400 (in hex). The probability is the drop's number divided by 400 (in hex).
- Blue - Vulnerability checkmarks. This decides what can damage an enemy.
- Purple - GFX and Pallete offsets. You can directly go to the graphics editor with these.
- Black - AI Offset. This just indicates to where the AI for the sprite is.
b. Spriteset Editor
Each room has a specific spriteset chosen for its room that can only have up to 8 rows of sprite graphics. This means that stuff like bosses and larger enemies may create problems if you want to have a lot of enemy variety in your room.

- Red - Graphics layout. Each spriteset can only have 8 rows of graphics. The bottom two rows are reserved for messages, so make sure that you don't have anything in those two rows if your room contains an item.
- Orange - Preview. Shows the currently selected sprite.
- Yellow - Palletes. These are all the sprite palette rows being used up by sprites in the spriteset.
- Green - Selection of spriteset editor and slot. There can be as many as F slots (aka 15 enemies), however this isn't particularly useful since you can only have 8 rows of graphics anyways.
- Blue - Sprite selection for the current slot you have selected. Then you also select what row the top row of the gfx should be on.
- Purple - Import/Export. You can import and export spritesets.
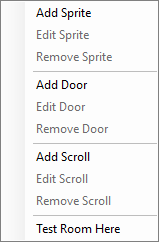
2A- Sprites
Right clicking anywhere on a room whilst in sprite edit mode will bring up the following menu
2B- Doors
2C- Scrolls
Editors
Header Editor
Tileset Editor
Graphics Editor
Palette Editor
Tile Table Editor
Animation Editor
Sprite Editor
Spriteset Editor
Connection Editor
Minimap Editor
Text Editor
Demo Editor
Physics Editor
Weapon Editor
Tools
Room Options
Minimap Tile Builder
Add
Patches


